National Diploma Year |
Project Title: Salvation Army Fashion show | Verified On: |
Project Leader: | Verified by: |
Start Date: 07-03-11 | Submission date: 23-03-11 |
Student Name: |
Unit No & Title(s) | Unit: W/P |
Unit : Enrichment |
Background: This project has been developed to enrich the learning of all students. Its aim is to build on already developed skills, touched upon in previous units. It also offers the opportunity for all learners to investigate new areas in which to develop knowledge and skill, such as group work and collaborative designing and learning. This project will strengthen your understanding of the design process and inspire you to further investigate your new skills in future units. | ||||
The Brief: Using the requirements set by your client (the fashion show events team) you will research, develop and make an outfit from used garments, donated by the Salvation Army. These will feature in a fashion show at ‘As you like it’ on the 4th May where you will be responsible for dressing and styling your outfits for the runway. As a class you will be split into 4 groups and be responsible for a separate trend/collection, these are: Colour Block, Seventies, Garden Party and Tribal/Safari. Your will research current trends using a variety of sources. Each group will have allocated trends to incorporate into their collection, using these as a source of inspiration for colour, shape/silhouette, technique and detail. You will be working in pairs to create one outfit, taking care to consider your team members designs to create an innovative and cohesive collection. You will have to be creative when developing your designs, referring back to your technical file to incorporate print and fabric manipulation techniques & processes. This will give your used garments a new function, breathing life back into these unwanted clothes! In addition to this, you will create a blog where you can showcase your work i.e. trend boards/research, drawings/sketches and photographs of your outfits. You must think of a creative name for your blog however, do not use your full real name. | ||||
Activities & Tasks: | ||||
Research: | ||||
1. You will start this project by researching fashion trade magazines and fashion websites such as vogue and style.com to investigate new and current trends. You will be allocated one trend in particular to explore: you will need to look at a range of designer collections for the reason that many designers can focus on similar trends but interpret them in a different way. Take note of textiles techniques, fabric, colour, shape/silhouette, styling and overall mood of the collection. This will be presented onto an A3 board that you will present to the whole class. 2. Once trend research has taken place, you will be paired up to bring your research and ideas together and begin to design your outfit: you are now also part of a larger design team and it is important to liaise with and consider the views of all team members to ensure your ‘collection’ sits well together and is a success! | ||||
Development: You will now use your research and selected garments to start drawing your design development. Considering the restraints set by your client and the material available. In your pairs you should each work on sketching out designs, continually discussing these together. You should interact with your group on a regular basis to share design ideas to ensure cohesion. This will be done in the form of regular class & group critiques. Ideas and thoughts discussed, as a group should be taken on board when continuing development. You should begin to work with your garments on the stands, experimenting with a variety of ways to translate & customize them into you design. You must document this process, making sure to photograph the changing form of your garments, and sketching to support this information. You should refer to your technical file and consult technicians during your allocated workshop time to achieve your desired look. Collect samples and swatches of techniques you carry out. To present your development you must compile drawings, notes, photographs, swatches, samples, make up & styling ideas and inspiration on separate visual sheets: you should be uploading this work to your blog throughout the duration of the project. This can be A4 or A3 and should be a recording of your journey to the catwalk. | ||||
Final Outcome: · 1x A3 trend board · One outfit, which you will make in pairs. This should adhere to your given trend/trends and the restraints set by your client. Your outfit should be innovative, exciting and must be a re-invention of old unwanted garments. · Separate visual sheets that must show trend research, your ideas/development, and your journey to the catwalk: this should be uploaded to complete your blog · This must then feature as part of a group trend/collection. Your designs must be coherent and show collaboration and teamwork. This will take place at ‘As you like it’ on 4th May. | ||||
Presentation: You will produce: · 1x A3 trend board · Final outfit, featured as part of a collection. · Separate visual sheets for your Blog: This should include Separate visual sheets that must include trend research, your ideas/development - a minimum of 10 garment designs, supported by photographs, swatches, notes & any other appropriate recording of your whole process. | ||||
Learning materials and Information: Resources: Donated garments from local charity shops Books & Periodicals: Textile View Collezioni Show Details Vogue IT Resources: Additional Information to note: REQUIREMENTS OF YOUR CLIENT:
|
SCHEME OF WORK
Date: | Event: |
Mon 7thMarch | Briefing from events team 9.00 am. Each group to start researching their given trend and put together an A3 board. |
Tue 8th March | Critique 9.00 am. Whole class to show and discuss trend boards. Appropriate garments allocated to each group. Begin design development. |
Wed 9th March | Continue with design development working in pairs; start to work with garments on stands. Groups to reform for critique to present ideas to each other and discuss. Allocated workshop time. |
Mon 14th – wed 16th March | IV Week – off site. homework: continue with visual sheets and create blog |
Mon 21stMarch | Begin constructing garments. Photograph and document the development/processes. Consult technical folder to support choices. Workshop for backstitch & running stitch to support garment construction for those who need it. Models to meet with allocated designers to have a fitting at 1:00. |
Tue 22nd March | Continue with garment construction. 1:00 pm group crit for each of the three groups. Supported discussion of ideas. |
Wed 23rd March | Finalize garments: Consider styling, accessories and final touches. Models to meet with designers for final fitting. Crotique at 2.00 pm. Continue adding to blog. |
Functional Skills/National Tests – FOR STAFF USE ONLY | |||||
Functional Maths | Functional English | Functional ICT | |||
Understand routine and non- routine problems in a wide range of familiar + unfamiliar contexts + situations | FSM1 | Make a range of contributions to discussions + make effective presentations in a wide range of contexts | FSE1 | Select, interact with + use ICT systems independently for a complex task to meet a variety of needs | FSC1 |
Identify the situation or problem + mathematical methods needed to tackle it. | FSM2 | Compare, select, read and understand texts + use them to gather information, ideas, arguments + opinions | FSE2 | Use ICT to effectively plan work + evaluate the effectiveness of the ICT system used | FSC2 |
Select + apply a range of mathematics to find solutions | FSM3 | Write documents with some adaption to the intended audience | FSE3 | Manage information storage to enable efficient retrieval | FSC3 |
Use appropriate checking procedures + evaluate their effectiveness at each stage | FSM4 | Write documents to communicate information, ideas + opinions using formats + styles suitable for their purpose + audience | FSE4 | Follow + understand the need for safety + security practices | FSC4 |
Interpret + communicate solutions to practical problems in familiar + unfamiliar routine contexts + situations | FSM5 | Write documents, including extended writing pieces, communicating information, ideas + opinions, effectively + persuasively | FSE5 | Troubleshoot | FSC5 |
Draw conclusions + provide mathematical justifications | FSM6 | ||||
Above is the project brief.
Below is my online recording of the project.
Basically we've been given the task to create 10 different outfits using garments donated by savvy which will then go down the catwalk.
Four separate groups, four separate trends.
70's Fashion, Colour Block, Garden Party and Tribal Safari.
I am in the Colour Block group.
As there are too many people in the group to do an outfit each, some of us paired up, me being one who is in a pair.
My trusty steed is Kate Henderson, blog name = WhatAPileOfKite.
When I heard that I was doing Colour Block, admittedly, I was mortified. One reason being that i'd done mood boards for Colour Block for the past two projects and am simply sick of the sight of it.
I pressed on and I'm beginning to rather enjoy the task at hand, even though it is Colour Block...

Below is one of the four pre-made boards for each trend. The board for the trend I have been selected. Colour Block.

There are many images of outfits and separate garments that represent Colour Block for both male and female.
This also demonstrates that in Colour Block it doesn't have to be a maximum of one colour per outfit, but infact it could be a minimum of three.
Each colour is depending on another colour to contrast against it, thus making the former colour stand out more. A never ending cycle of contrasting colours complimenting each other.
Personally I believe that Colour Block outfits work more when there is a seperate colour for each individual garment.
This is the mood board that I put together to represent Colour Block.

Colour Block = One block of colour throughout.
Colour Pop = Many variations of colour throughout.
Luckily (skillfully), I found some colour charts in one of the stated magazines which create an ideal background for my images and this trend.
I then phished through my selected images with a yes, no, yes, no approach and reached my final chosen images to use. Great.
Scissors, rubbish and a hell of a lot of BluTack later, my images are in place.
Now all I need to do is pull them all back off and use glue this time. Daayyym...
Below are the garments kindly donated to us by the Salvation Army.
Soon to be recognised as the most stylish outfits in Colour Block known to man?
To be transformed...

Just a sneaky peek at the garments without any alterations.
These are all displayed in the same condition of which they were recieved.
To be continued...


The garments that we chose WERE one of two yellow curtains and a purple blouse, little did we know that the purple blouse would turn into a pink blazer type jacket.
The sketch demonstrates different rough ideas for each garment.
The blouse was to be transformed into a blazer with yellow lapelles and cuffs, which would then be starched to sharpen the look.
The curtains to be turned into a very flash pair of shorts with purple turn ups.
Layers of different top shapes in different colours inbetween.
Observe...

So Kate and I are styling for a man.
After we'd got worked up about the possibilities of making a beautiful long flowing gown or some sexy, Katy Perry style, high waisted hot pants, and gotten ourselves so overly excited with all of these small yet fantastic ideas well, our parade got well and truely rained on to say the least.
Yes, men.
Contrary to the obvious devastation that we suffered, it isn't actually that bad.
This collaboration of images from the Colour Block trend for men proves that not high waisted shorts - but not average waisted shorts - are in? OH YES!
And we can still make a blazer? OH YES!
What can I say, our model is going to look a treat.

We nearly made a modern invisibility cloak which yes, maybe Harry Potter would have loved, but it just wasn't going to be catwalk worthy.
Our new garment, a pink blazer style jacket.
We rolled the sleeves up as a very simplistic starting point to reveal a very tasteful pink polka dot lining. This will make a good cuff.
We then started to experiment with the collar...


I achieved a Distinction grade for this project.
Yes, the collar.
Pinning, un-pinning, re-pinning, de-pinning. Whatever kind of pinning, I'm sure we did it.
From Snow Queen chic to tamed lion to, lets say, tamed lion with a bit of oomph?
At least I know what I'm talking about.
Maybe some more pinning is needed and some more ways tried, but personally my thoughts lie with the last two images.
Now some more pinning.


Yes, pinning.
We knew that the back of the blazer was boring. It was beyond boring.
So some pins here and there and VOILA! the back has turned into the fabulous catwalk hunny that we were looking for.
We started this by just simply pinning one side as shown in the first three images, then we just tested the other side along with it and found that it worked.
The blazer is now a masculine lion with oomph and a tidy behind?
Something like that.
But it works, so after oodles of pinning and trimming the blazer has been sent to some very lovely machinists to sew.
Fingers crossed!


So we have progress on the blazer situation and have started on the shorts.
As a first time for me, I think I did pretty well on the pattern cutting front. It didn't prove to be as hard as I had in mind.
We cut four pieces and pinned them together to create a pair of shorts.
Big, beautiful, yellow, MC Hammer shorts. They have a low crotch and will have some thick turn ups at the bottom and a matching thick waistband.
These have been sent to the technicians to be sewn together.
Thanks guys!

The shorts are all stiched up and ready to go.
This is the first try on.
Bit of a tight squeeze what with the trousers being on, but at least we know they will definately fit.
Not long until a picture with the blazer too.
Fly.
This is the first try on.
Bit of a tight squeeze what with the trousers being on, but at least we know they will definately fit.
Not long until a picture with the blazer too.
Fly.

For accessories, i'm thinking a contrasting jelly shoe, possibly with rolled down ankle socks. This idea will create a summer look, and with a contrasting shoe the entire outfit will stand out. Jelly shoes are on their way back in and I want to speed up that process.


Or some plimsolls with ankle socks. Only white plims though, they will look clean against the rest of the outfit, compliment the colours and keep the summer look.
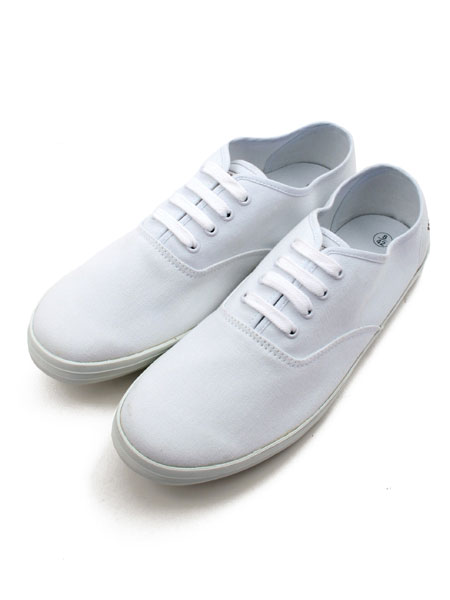
The only slight hick in these shoe ideas are that most jelly shoes are for children or women.
My model isn't a child or a woman. And he's a size ten...
The thoughts are to slick my model's hair back into a bun because he has long hair.
This is also handy as the outfit is very summer chic and in the summer hair is always tied back.
These are the styles of make-up that I hope can be achieved on my model. They are so artistic and creative, colourful, vibrant and unusual.
The first image is more or less exactly what I'd pictured in my head. Colourful and original. To top it off, the hair is exactly what I'd like too.
The eye lashes in my second image are amazing, I would definitely love to use this idea on my model.
Image three caught my eye through the way that the colour from the eyebrow grows around to the cheeks.
The colours in my final image grabbed me by having two neutral colours on the face then a striking green on the eye lids. This has got to be something to consider.
I doubt my model will be game for any of this.


As a group we decided to dip-dye some of our garments in the collection so that there is a consecutive similarity throughout. Doing this will achieve a two-tone yet simplistic look, just as Jill Sanders' SS11 Menswear collection.
Obviously things did not go to plan.
The pink blazer has a waterproof coating over it due to it previously being a raincoat, meaning that it doesn't take to conventional inks so instead we had to heat press the inks to get a blocked look.
We taped a line with masking tape evenly around the jacket two thirds up to ensure our dyed line was straight. Little did we know that when we put the masking tape in the heat press it would stick right into the jacket and stain.
I might have also accidentally printed over the line.
Whoops!


We're back on track now.
Ohhhh yes!
We aquired an ink that was extremely thick, normally to be mixed with water, and slapped it on the back panel of the blazer.
This special ink is normally to be mixed one part ink, two parts water, but as the blazer doesn't take to water based inks, we used the ink in it's initial state and found great success.
The thick ink was painted onto the blazer and dried with a hair dryer.

Obviously this is still a bit of a mess, but it isn't half as bad as when it was disasterous.
The effect that we decided we would achieve is one similar to the old school adidas jackets that would have a worn, coloured back panel.I think we did pretty damn well.

Just waiting for the fashion show pics to put up...

No comments:
Post a Comment